
How to Configure GitLab Integration in TestGrid
Overview:
TestGrid GitLab Integration enables teams to seamlessly connect their GitLab repositories with the TestGrid platform, allowing automated test execution as part of the CI/CD pipeline. This integration helps development and QA teams trigger tests automatically, monitor execution results, and maintain continuous quality throughout the software development lifecycle.
By integrating GitLab with TestGrid, you can:
- Trigger TestGrid test executions directly from GitLab CI/CD pipelines.
- Automate regression, smoke, and functional testing after every code commit or deployment.
- View test execution status and results within your development workflow.
- Reduce manual testing effort and accelerate release cycles.
- Ensure faster feedback on code changes and improve software quality.
This integration is ideal for teams practicing Continuous Integration (CI) and Continuous Delivery/Deployment (CD), enabling automated validation of applications with every build.
What this guide covers
This guide walks you through connecting a TestGrid version to a GitLab repository and then working with your changes once that connection is in place.
There are two things happening here, and it helps to keep them separate in your head.
The setup. Someone with admin rights creates a GitLab repository, generates an access token for it, and stores that token in Vault. This happens once per repository.
The daily work. You link a TestGrid version to that repository, make your changes, and commit them to GitLab. This is what you will do regularly.
Parts 1 and 2 are the setup. Parts 3, 4, and 5 are the daily work.
Before you start: who does what?
| Part | What happens | Who does it? | How often |
|---|---|---|---|
| Part 1 | GitLab project, repository, and access token created | Team admin | Once per repository |
| Part 2 | Access token stored in Vault | Team admin, with help from the platform team if needed | Once per repository |
| Part 3 | TestGrid version linked to the repository | Any user with access to the version | Once per version |
| Part 4 | Making changes in draft | Every user | Daily |
| Part 5 | Committing changes to GitLab | Every user | Regularly, as often as you can |
If Parts 1 and 2 have already been done for your repository, skip to Part 3. You will need the Vault path and the token name from whoever did the setup.
Part 1: Create the GitLab project and repository
Who: Team admin How often: Once, per repository
Step 1. Create the project and repository.
On the GitLab platform, create the project and repository you want to use.
Set up a folder structure that either mirrors the structure you have in TestGrid or one that suits how your team works. Either is fine. What matters is that you pick one and stick to it, so people know where to look.
Step 2. Create a project access token.
Go into the repository, then open Settings, then Access Tokens.
| Important: Make sure you are inside the repository itself. Not the parent project, and not the subgroup. It is easy to land on the wrong screen here, and a token created at the wrong level will not work. |
Step 3. Set the token parameters.
When you create the token, set these exact values:
| Setting | Value |
|---|---|
| Role | Developer |
| Expiry date | At least 60 days out |
| Scopes | api, read_repository, write_repository |
All three scopes are required. Missing one will cause the connection to fail later, usually at the point where TestGrid tries to load your repositories.
| Track the expiry date. Put it somewhere you will actually see it, like a shared calendar reminder a week before. When the token expires, commits will start failing and it will not be obvious why. |
Step 4. Copy the token immediately.
GitLab shows the token once, at the moment it is created. You cannot go back and view it again.
Keep it in your clipboard and move straight on to Part 2. Do not close the screen until the token is safely stored in Vault.
| A note on security. Your organization’s security policies typically require that these tokens must not be shared over email or chat messages. If you need someone else to store the token for you, arrange that before you create it, so you are not sitting on a live token with nowhere to put it. |
Part 2: Store the token in Vault
Who: Team admin, or the platform team on your behalf How often: Once, per repository
Step 5. Add the token to a Vault folder.
Store the token you just created as a secret in Vault.
Give it a name that makes it obvious which project and repository it belongs to. Six months from now, someone else will be reading that list and trying to work out which token is which.
| Create a separate folder for each project. Do not put tokens for different projects in the same folder. When you connect from TestGrid, you pick a folder and then choose a secret from what is inside it, and the repository list you see next depends entirely on which token you picked. Mixed folders make that step confusing and easy to get wrong. |
Step 6. Record the path
Write down the Vault path and where each secret sits.
You will need to type that path into TestGrid every time someone links a new version. Having it recorded turns a five minute hunt into a ten second paste.
If you do not have Vault access
If you cannot create or save a secret in the Vault folder, contact the platform team and ask them to store it for you.
Arrange this before you create the token in Part 1, because the token can only be viewed at the moment it is created. Remember that you cannot send it over email or a message, so you and the platform team will need to agree on how to hand it over.
Part 3: Link a TestGrid version to the repository
Who: Any user with access to the version, How often: Once, per version
Before you start, make sure you have the Vault path and know which secret holds the token for the repository you want.
Step 7. Open the integration dialog.
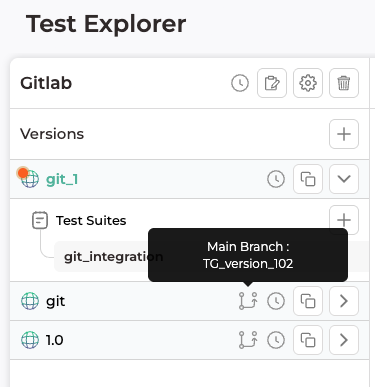
Open the version you want to link.
Look for the Git icon at the top right of the version page. Click it.
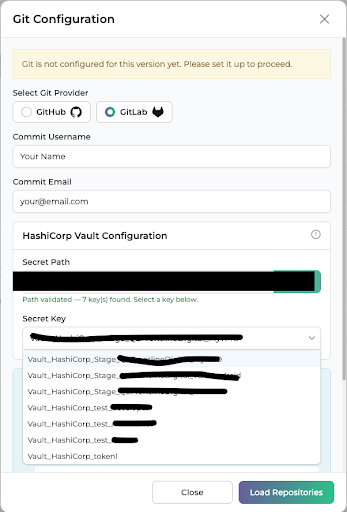
Step 8. Choose your provider.
You will be asked to choose between GitLab and GitHub. Choose GitLab.
Step 9. Check the commit details.
Two fields appear:
| Field | What it does |
|---|---|
| Commit Name | The name your commits will appear under. Pre filled with your TestGrid username |
| Commit Email | The email attached to your commits. Pre filled with the email you signed in with |
Both are pre-filled. Check them and change them if you need to.
These matter more than they look. They are what shows up as the author against every change you push to GitLab, so if they are wrong, your work will be credited to the wrong person or to nobody at all.
Step 10. Point TestGrid at your Vault token.
Now provide the token. Rather than typing it in directly, TestGrid retrieves it from Vault.
- Enter the Vault path where your token is stored.
- Click to validate the path. This confirms TestGrid can reach it.
- From the list of secrets found in that folder, select the token for the repository you want to link.
This is where the separate folders from Part 2 pay off. If everything is in one folder, you will be picking from a long list of similar-looking names.
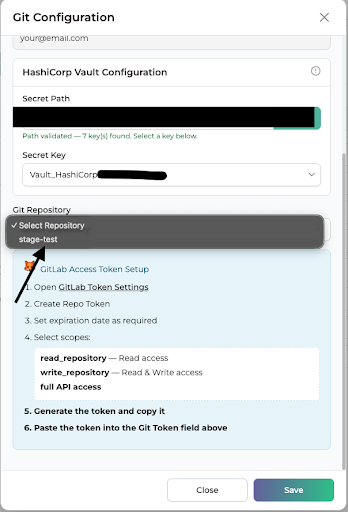
Step 11. Load and select the repository.
Click Load repositories.
TestGrid uses the token you selected to fetch the repositories it can see. Pick the one you want to link, and confirm.
| If the repository you expected is not in the list, the token is almost certainly pointing at a different repository, or it is missing one of the required scopes. Go back and check the token before trying anything else. |
Step 12. Confirm, and see what happens.
Once you confirm:
- The Git repository is initialised
- A new branch is created inside the project or repository
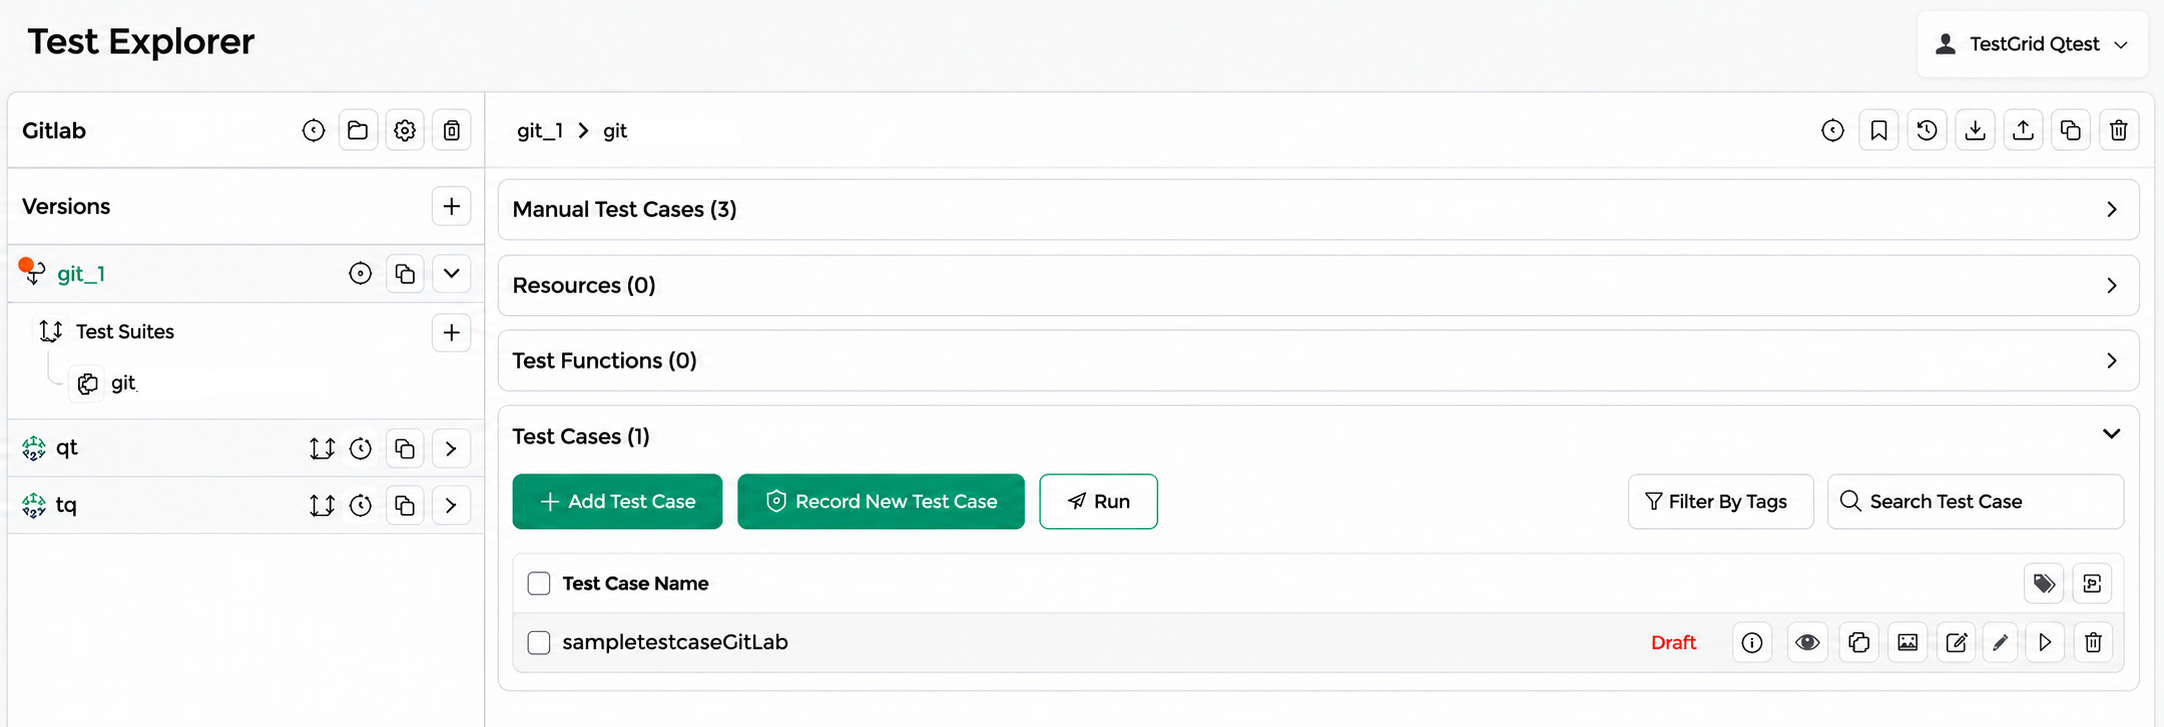
- The branch name appears next to the version name inside the project
That branch name is visible to everyone, not just you. You can also see it in the same place the Git integration dialog opens from.
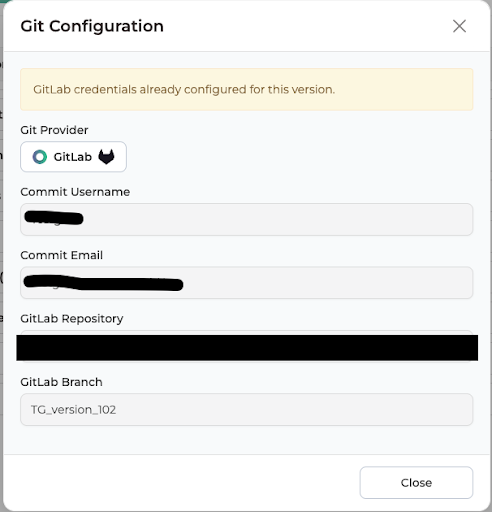
| Please note: A repository that has been linked cannot be unlinked from the interface. There is currently no way to disconnect or repoint a linked version yourself. Be sure you have selected the right repository before you confirm. |
Part 4: Working in draft
Who: Everyone How often: Every time you make a change
This part is important even if you never link a version to GitLab, because the draft rules apply across the whole platform.
What changes after integration?
At the moment a version is integrated, the current state of everything is saved. That becomes your starting point.
From then on, every change you make, except changes to Tags, is a draft.
What a draft actually is
A draft is your own private working copy.
Anything you change after the integration is live is limited to your account. Nobody else on TestGrid can see it. Your changes stay invisible to the rest of the team until you commit them to GitLab.
This gives you room to work. You can change something, look at it, change your mind, and undo it, without anyone watching over your shoulder.
How to spot a draft
Resources with unsaved work carry a Draft label next to them.
A version with changes still waiting to be committed shows a small red dot. That dot means there is work here that has not reached GitLab yet.
Checking what is pending
To see everything you currently have in draft:
- Open the Version menu
- Click the commit icon, which sits just to the left of the Git icon
You will see the full count of changes waiting to be committed.
Discarding work you do not want
At any point you can throw away draft changes. You can:
- Discard the changes to a single resource, or
- Discard everything currently in draft
Discarding is not reversible, so be sure before you click.
Two rules to know about
The draft rules apply everywhere. Even versions that are not linked to GitLab follow the same draft behaviour. This is not only a Git thing.
A resource you are drafting is locked to everyone else. While a resource is in draft state for you, nobody else can edit it. Not until you commit your changes or discard them.
This is deliberate. It stops two people editing the same thing and one of them losing their work. But it does mean that if you leave a draft sitting open for days, you are holding a lock that your teammates may be waiting on.
| Which is why the advice is simple: once you are happy with a set of changes, commit them. Commit at regular intervals rather than saving everything up for the end of the week. It keeps the team unblocked and it keeps your commit history readable. |
Part 5: Commit your changes to GitLab
Who: Everyone How often: Regularly
Step 13. Open the commit screen.
On the version page, find the commit action next to the GitLab logo, and click it.
You do not need a token to commit. Once the version and repository are linked, that is handled for you. Your email is used as the commit author, so the change shows up in GitLab under your name.
Step 14. Review what you are about to commit.
You will see a list of every change currently in draft and ready to go.
For each resource you can:
- View the changelog to see exactly what changed
- Discard that draft individually if you have changed your mind
- Discard all drafts if you want to start over
Take a moment here. This is your last chance to check the work before it reaches GitLab.
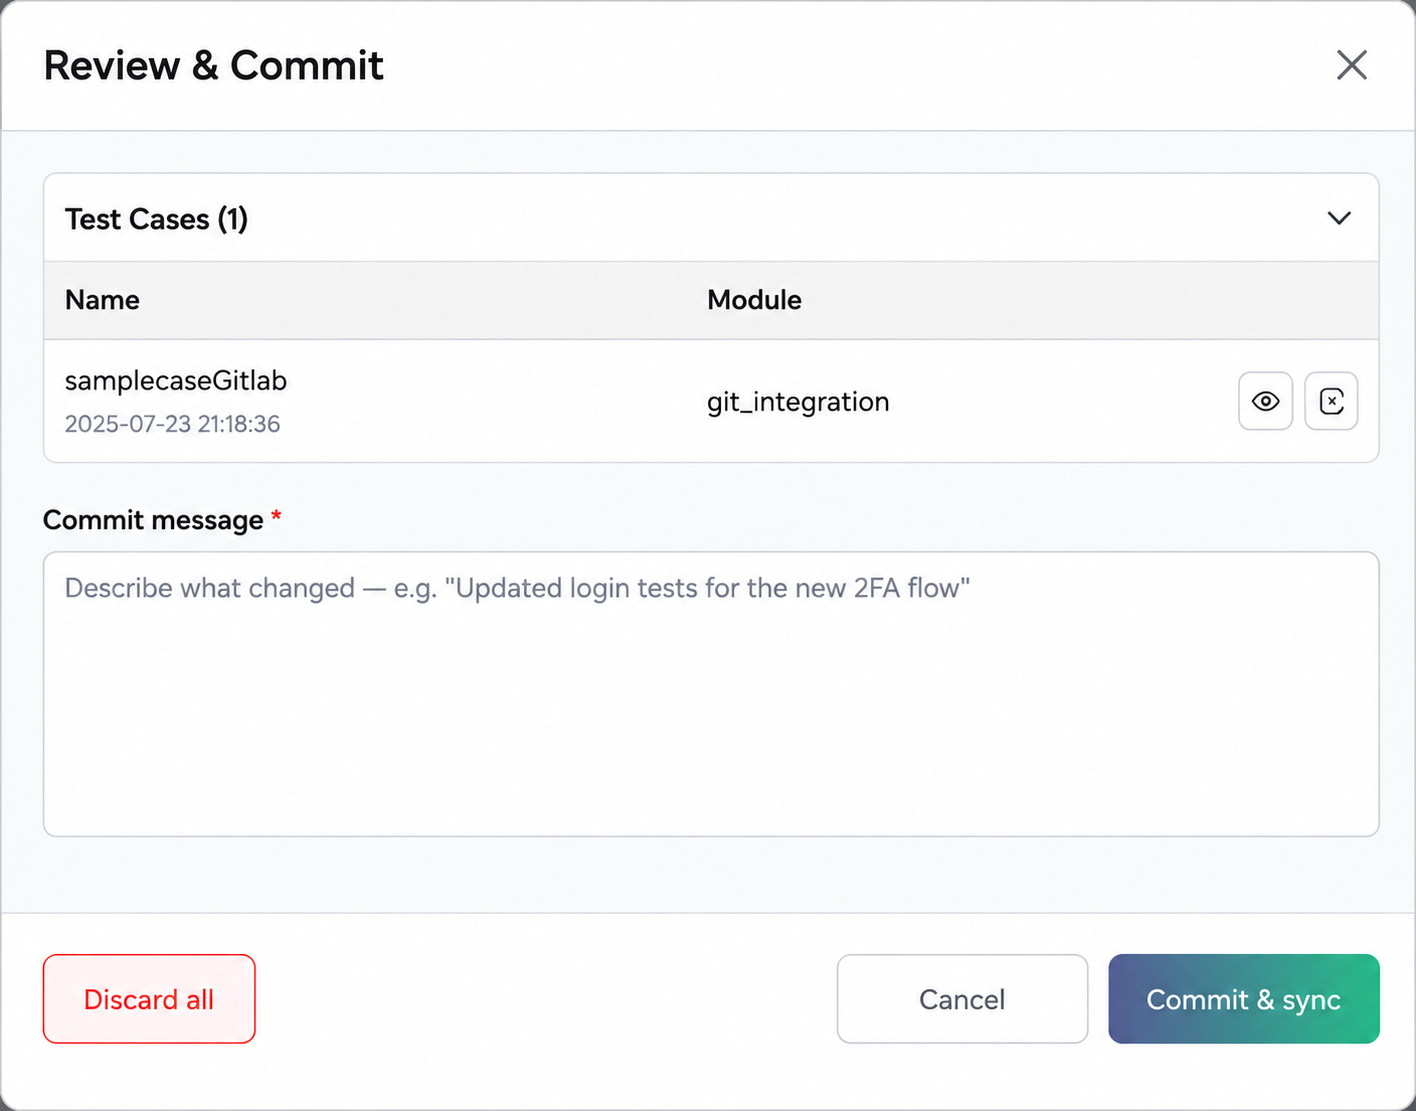
Step 15. Write a commit message.
Enter a commit message. This is mandatory. The commit will not proceed without one.
A useful message says what changed and why. “Updated login test to handle the new OTP screen” is worth writing. “Changes” is not, and your future self will not thank you for it.
Step 16. Commit
When you confirm, TestGrid runs three steps in order:
| Step | What happens |
|---|---|
| 1 | Changes are saved to the TestGrid platform. |
| 2 | Changes are pushed to qTest. |
| 3 | Changes are committed to GitLab. |
This sequence keeps all three systems in step, so you do not have to remember to do them separately.
| If a step fails, you will be offered a retry. Use it. The point is to get all three systems in sync, and a partially completed commit leaves them out of step. |
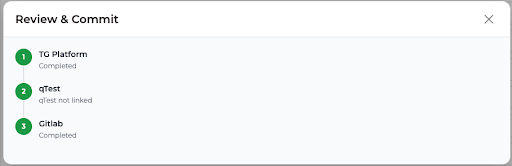
One commit at a time.
Only one commit can run at a time.
If someone else on your team is committing when you try, you will see a message asking you to wait for the running commit to finish. This is expected. Give it a moment and try again.
Quick reference
Setup, once per repository
| # | Action | Where |
|---|---|---|
| 1 | Create a project and repository. | GitLab |
| 2 | Create a project access token inside the repository. | GitLab, Settings, Access Tokens |
| 3 | Role Developer, expiry 60 days or more, scopes api, read_repository, write_repository | GitLab |
| 4 | Copy the token immediately; it is shown only once. | GitLab |
| 5 | Store in a vault with a clear name, one folder per project. | Vault |
| 6 | Record the path. | Wherever your team keeps notes |
Linking, once per version
| # | Action | Where |
|---|---|---|
| 7 | Git icon, top right | TestGrid version page |
| 8 | Choose GitLab. | Integration dialog |
| 9 | Check Commit Name and Commit Email | Integration dialog |
| 10 | Vault path, validate, select the token | Integration dialog |
| 11 | Load repositories, select, and confirm. | Integration dialog |
Daily
| # | Action | Where |
|---|---|---|
| 12 | Make changes, and they become drafts. | Anywhere in the version |
| 13 | Check pending count. | Version menu, commit icon |
| 14 | Commit action, review, and discard anything unwanted. | Version page, next to GitLab logo |
| 15 | Write a commit message, mandatory. | Commit screen |
| 16 | Confirm and retry any failed step. | Commit screen |
If something goes wrong
| What you see | What it usually means | What to do |
|---|---|---|
| The Vault path will not validate | The path is wrong, or you do not have access to that folder | Check the path with whoever set it up. If access is the problem, contact the platform team |
| No secrets listed after validating the path | The token was stored somewhere else, or in a different folder | Check with your admin which folder holds the token for this repository |
| Load repositories returns an empty list, or not the one you want | The token points at a different repository, or is missing a scope | Confirm the token was created inside the repository, not the parent project or sub group, and that all three scopes are set |
| Commits started failing and nothing changed on your side | The access token has expired | Ask your admin to create a new token and store it in Vault |
| You cannot edit a resource | Someone else has it in draft | Ask them to commit or discard. The lock clears when they do |
| A message asks you to wait | Another commit is running | Wait for it to finish, then try again |
| One of the three commit steps failed | Any of several causes, including a network issue | Use the retry option. If it keeps failing, raise it with the TestGrid team |
| You linked the wrong repository | There is currently no self service way to undo this | Contact the TestGrid team. This cannot be fixed from the interface |
Things worth remembering
- The token is shown only once. Have Vault ready before you create it.
- Never send a token by email or message.
- Track token expiry dates. An expired token fails quietly from the user’s point of view.
- One Vault folder per project.
- Create the token inside the repository, not the parent project or sub group.
- Check the repository carefully before confirming the link. You cannot undo it yourself.
- Your drafts are private, but they lock the resource for everyone else.
- Commit often. It is better for you and better for the team.
- A commit message is mandatory. Make it a useful one.
- If a commit step fails, retry it rather than leaving the systems out of step.
Who to contact
| Situation | Who to contact |
|---|---|
| No access to the Vault folder | Platform team |
| Need a token created or the expiry extended | Team admin |
| Wrong repository linked to a version | TestGrid team |
| Commit failing repeatedly after retry | TestGrid team |
Happy Testing!