
-
Documentation
-
- Browser Cloud: Secure Remote Browser Testing
- Real Mobile Device Cloud: Secure Remote Mobile Testing
- How to get the User Token On TestGrid PlatForm
- Device Reservation
- App Management
- Image Injection for Camera Testing on Real Devices
- BioMetric Authentication
- Object Spy and Searching XPath in Appium Inspector
- Perform Geo-location Testing On TG Cloud
- Running ADB Native Commands with TestGrid Device Cloud
- Push Notification Testing in TestGrid Real Device
- Image Annotation for Marking Bugs with JIRA
- Manual Testing and Test Results with Mobile Screen Recording
- TG Connect (TG-Tunnel): Securely Connect Your Local/Low Environment to the TestGrid Device Cloud
- Central Repository for User Recordings Videos
- Configuring PIN on Real Devices in TestGrid
- TG Drive
- Browser resolutions and actions
- Real Devices Access Using Remote Lite URL
- Audio Output Streaming with TestGrid
- Virtual Remote USB Devices (vUSB) with TestGrid
- Device Cloud – Multiple Language Support
- View More Articles (7) Hide Articles
-
- Codeless/Scriptless Web Test Case Writer
- Codeless/Scriptless Mobile App Test Case Writer
- Scriptless Test Case Creation in TestGrid
- Web Test Case Execution
- Mobile App Test Case Execution
- Use Custom Expressions in Scriptless Test Cases with Java (Selenium & Appium)
- Network Assertions: Writing and Execution
- Video Recording for Build Execution in Codeless Testing
- Visual Regression Testing Using Codeless Automation
- Tap action with X and Y coordinates for perform on element Interaction
- Scriptless/Codeless Debugging
- Test Case Version's & Management
- AutoHeal and AutoFix for Codeless Test Automation
- Codeless Integration Testing with Network Assertions
- Using Global Variables in Test Cases and Functions
- Test Data Management with Parameterization in TestGrid
- Parallel Execution on Multiple Devices
- Parallel Execution on Multiple Browsers
- Using Import Statements and Custom Libraries in Versioned Test Suites
- Downloading Codeless Build HTML Reports for Web and Mobile
- Uploading Files for Website Testing via TestGrid TG Drive
- Debugging ‘Test Case Compilation Failed’ Error in TestGrid: Causes & Solutions
- Accessibility Testing
- Test Case Scheduler – Automate Your Codeless Builds
- Test Case Tagging In Codeless/Scriptless and Device Tagging
- Codeless Sequential Test Execution Across Web and Mobile Using APIs
- Test Case Execution on Android Emulators and iOS Simulators Using TestGrid
- How to Use TG Variables in Custom Script
- Retry Mechanism for Codeless Test Automation
- Codeless Projects: Access Control and User Role Assignment Guide
- Utility Keywords Guide
- Parameterizing a Test Case with a Database Source in TestGrid Scriptless
- Runtime Arguments
- View More Articles (18) Hide Articles
-
- Cross-Browser Testing with TestGrid Selenium Using Local Execution
- Accelerate Mobile App Testing with TestGrid Local Appium Execution
- View Execution Results and Reports of Automation Testing
- Local executions with Insights data & Page performance summary metric data
- Visual Regression Testing Using Local Execution
- Executing Your Local Web Automation Robot Code
- Robot Framework for Python: Local Mobile Automation with TestGrid Device Cloud
- Executing Appium Code from Windows Machine to Remote iOS Device
- Download Scriptless Generated Appium Code
- Native App Test on Android
- Native App Test on iOS
- Running Playwright Tests Remotely Using TestGrid
- Cross-Browser E2E Testing Using Cypress on TestGrid
- Dynamic Test Case Execution on TestGrid: Leveraging Random Device Allocation
- Run WebDriverIO Tests Remotely on TestGrid (Mobile & Browser)
- Run CodeceptJS Tests Remotely on TestGrid (Mobile & Browser)
- Best Practices & Troubleshooting Guide for Mobile Local Appium Execution with TestGrid
- Getting Started with API Testing in TestGrid
- View More Articles (3) Hide Articles
-
- PDF Validation with UI
- Automating Salesforce Application
- Automating Websites with iFrame
- Handling Dynamic Elements with Declare Keyword
- Automating Android Hybrid Apps
- Automating Flutter Application
- Automating APIs with Codeless Automation
- Integrating Selenium Custom Scripts with Codeless Automation
- Integrating Appium Custom Scripts with Codeless Automation
- Vault Test Cases – Integrating HashiCorp Vault with TestGrid Real Devices
- Reading and Auto-Entering OTP on iOS Using Appium in TestGrid
- Reading and Auto-Entering OTP on Android Using Appium in TestGrid
- Data-Driven Testing Using Database Integration in TestGrid Codeless
- Scriptless API Testing
- Executing Custom JavaScript in the Browser Console During Codeless Execution
- Runtime Arguments
- View More Articles (1) Hide Articles
-
- Jira Integration With TestGrid
- Slack Integration With TestGrid
- Microsoft Teams Integration With TestGrid
- Selenium IDE Integration with TestGrid through Selenium-Side-Runner
- Running Katalon TestCases on TestGrid Mobile Devices
- Running Katalon TestCases on TestGrid Browsers
- Ranorex integration with Testgrid
- Tosca Integration With TestGrid
- Integration of TestComplete by SmartBear with TestGrid
- Bitrise Integration with TestGrid
- Travis CI integration with TestGrid
- XRay JIRA Integration with TestGrid
- How to integrate HashiCorp Vault with TestGrid
- 1. CI CD Integration
- 2. Test Suite Management
- 3. Element Extraction from iOS and Android Device
- Scriptless Test Case Creation in TestGrid
- AutoHeal and AutoFix for Codeless Test Automation
- Automation Tips for React Native App Development
- BioMetric Authentication
- Network Assertions: Writing and Execution
- CircleCI Integration With TestGrid
- Cross-Browser E2E Testing Using Cypress on TestGrid
- Dynamic Test Case Execution on TestGrid: Leveraging Random Device Allocation
- Executing Appium Code from Windows Machine to Remote iOS Device
- Cross-Browser Testing with TestGrid Selenium Using Local Execution
- Executing Your Local Web Automation Robot Code
- Image Injection for Camera Testing on Real Devices
- Mobile App Test Case Execution
- Parallel Execution on Multiple Browsers
- Parallel Execution on Multiple Devices
- Performance & Load Testing using JMeter in TestGrid
- Real Devices Access Using Remote Lite URL
- Robot Framework for Python: Local Mobile Automation with TestGrid Device Cloud
- Running Playwright Tests Remotely Using TestGrid
- Codeless Integration Testing with Network Assertions
- Codeless/Scriptless Mobile App Test Case Writer
- Codeless/Scriptless Web Test Case Writer
- Scriptless/Codeless Debugging
- Tap action with X and Y coordinates for perform on element Interaction
- Test Case Version's & Management
- Test Data Management with Parameterization in TestGrid
- Accelerate Mobile App Testing with TestGrid Local Appium Execution
- TG Drive
- Tosca Integration With TestGrid
- Video Recording for Build Execution in Codeless Testing
- Visual Regression Testing Using Local Execution
- Web Test Case Execution
- Run CodeceptJS Tests Remotely on TestGrid (Mobile & Browser)
- Best Practices & Troubleshooting Guide for Mobile Local Appium Execution with TestGrid
- Getting Started with API Testing in TestGrid
- TG Connect (TG-Tunnel): Securely Connect Your Local/Low Environment to the TestGrid Device Cloud
- Parameterizing a Test Case with a Database Source in TestGrid Scriptless
- View More Articles (25) Hide Articles
-
-
Test Results
How to integrate HashiCorp Vault with TestGrid
Overview
This documentation demonstrates how to seamlessly integrate your HashiCorp vault instance into the TestGrid platform and guides you through the integration process and demonstrates how to utilize stored credentials within the codeless automation projects.
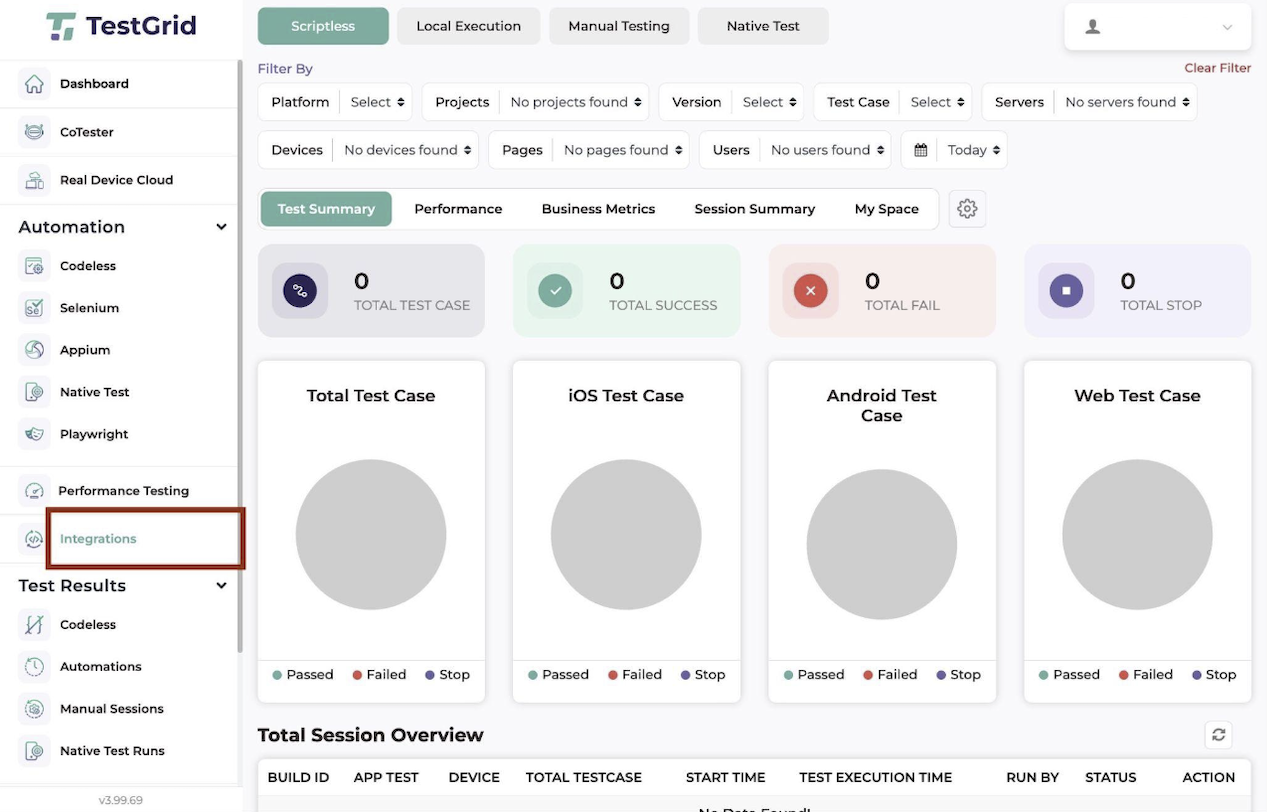
Step 1: Log in to the TestGrid using valid credentials and navigate to the Dashboard.
- Navigate to the Integrations section from the side panel
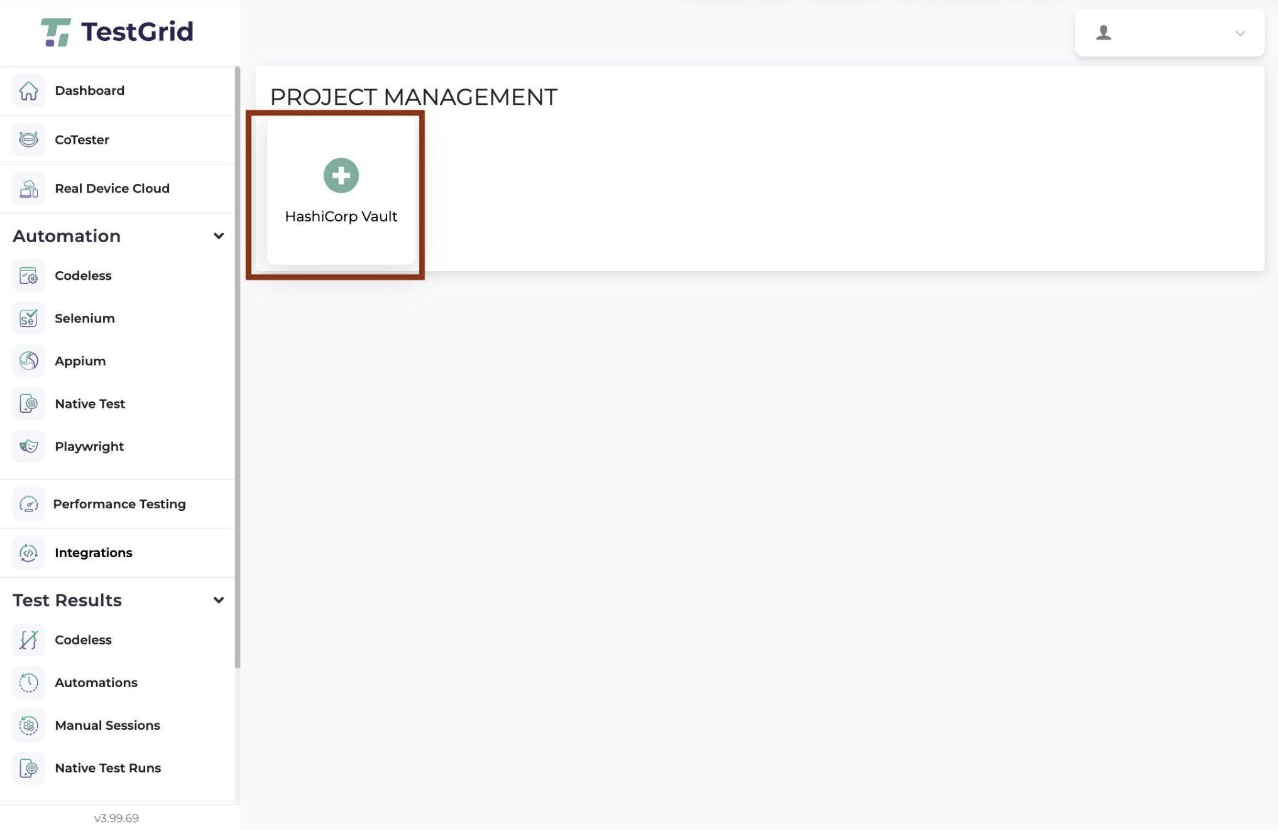
Step 2: In the Integrations section, select the “HashiCorp Vault” option as depicted in the below screenshot.
Step 3: Enter Vault credentials for your instance as depicted in the below screenshot.
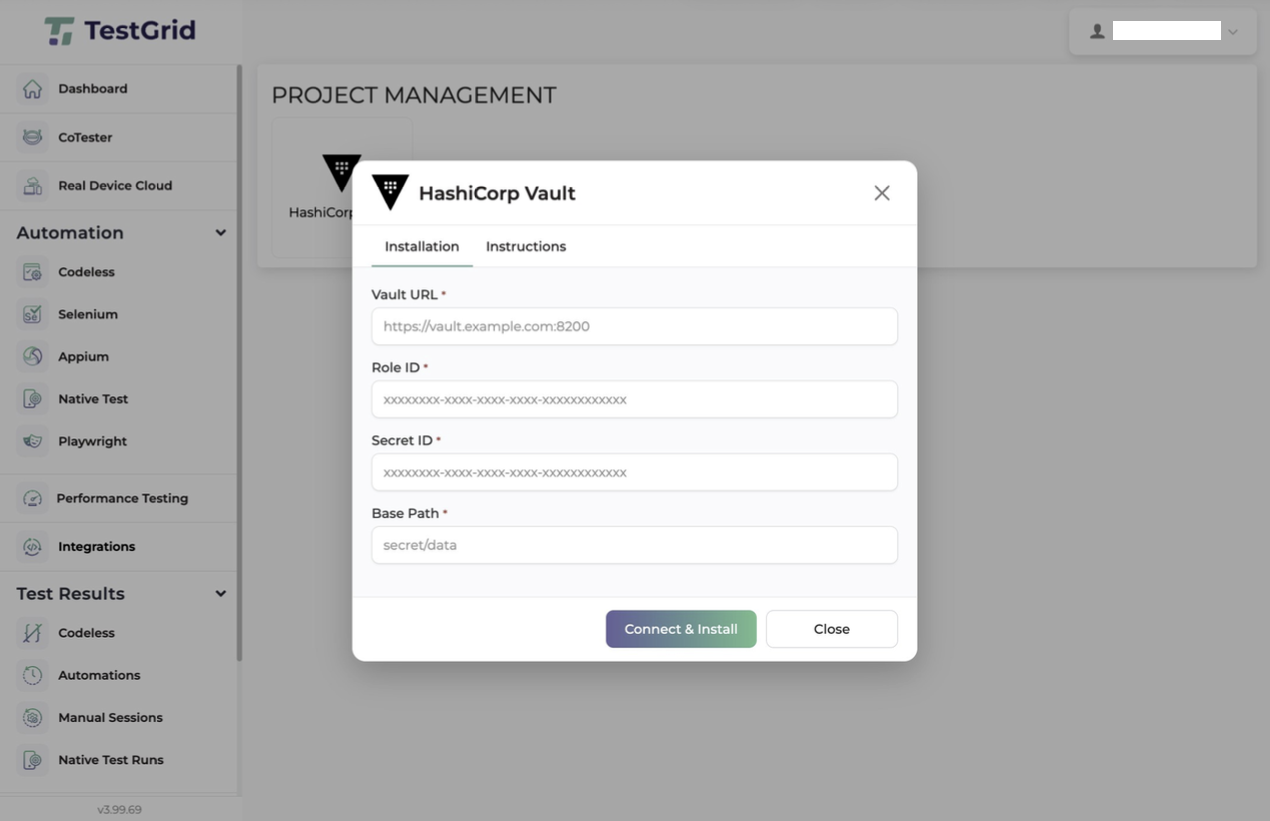
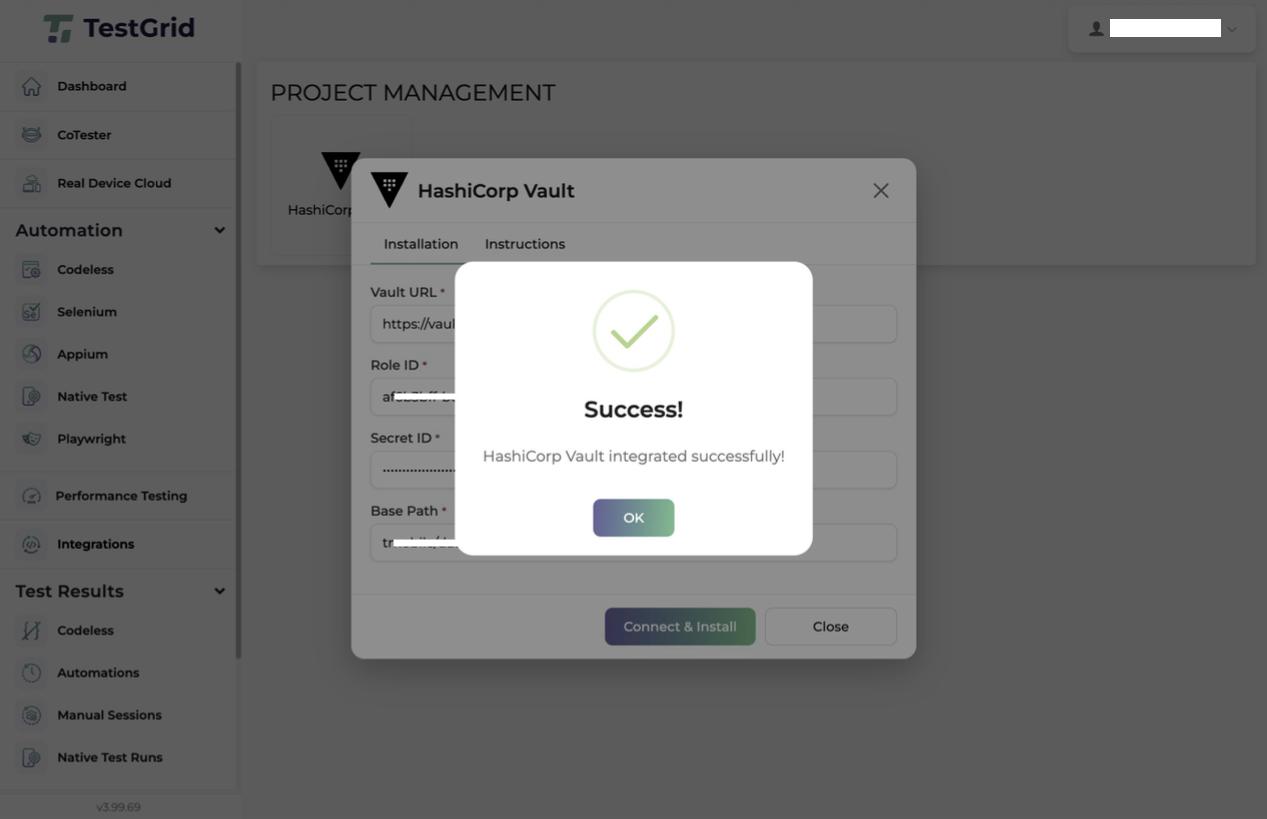
Step 4: Enter required details like the Vault URL, Role ID, Secret ID, and Base Path, and finally tap on the “Connect & Install” button.
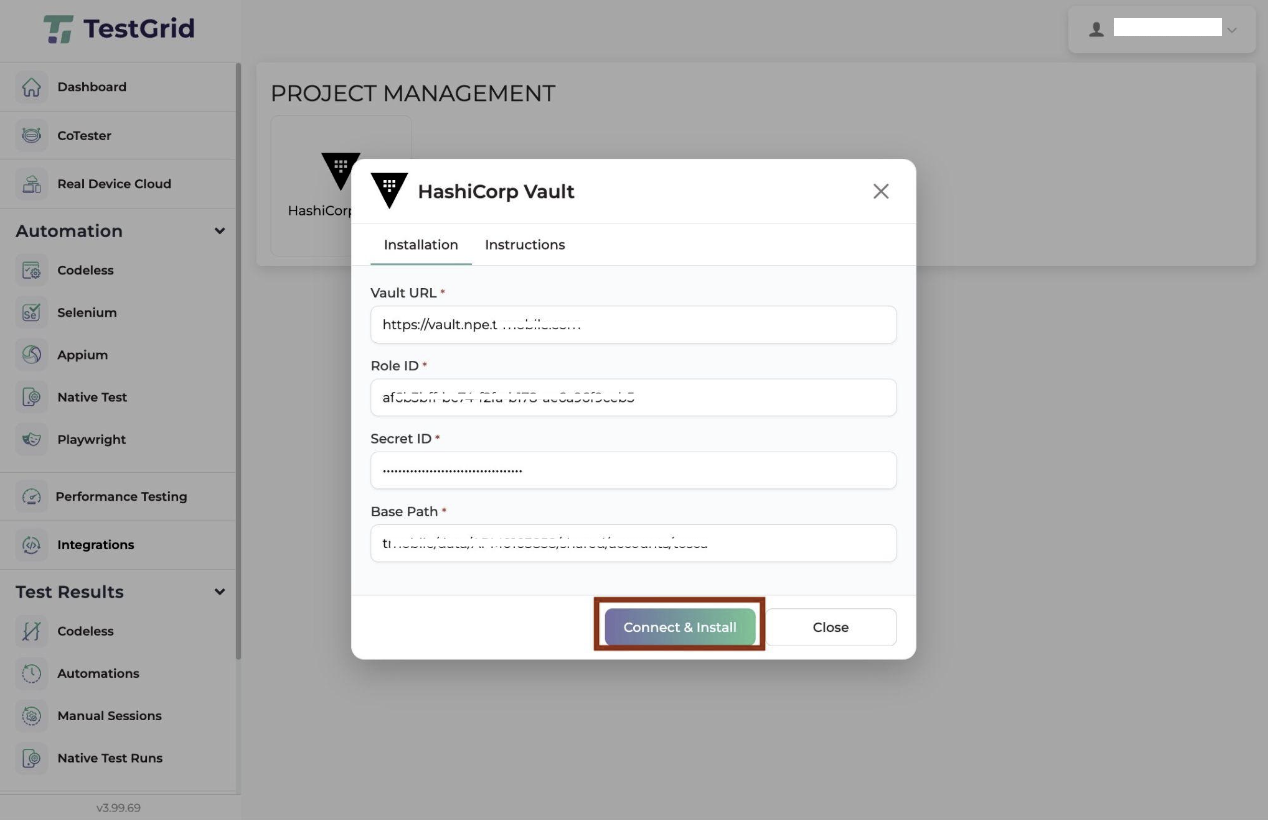
- After clicking on the “Connect & Install” button, the successful message appears on the screen, validating that HashiCorp Vault is now integrated successfully as depicted in the below SS
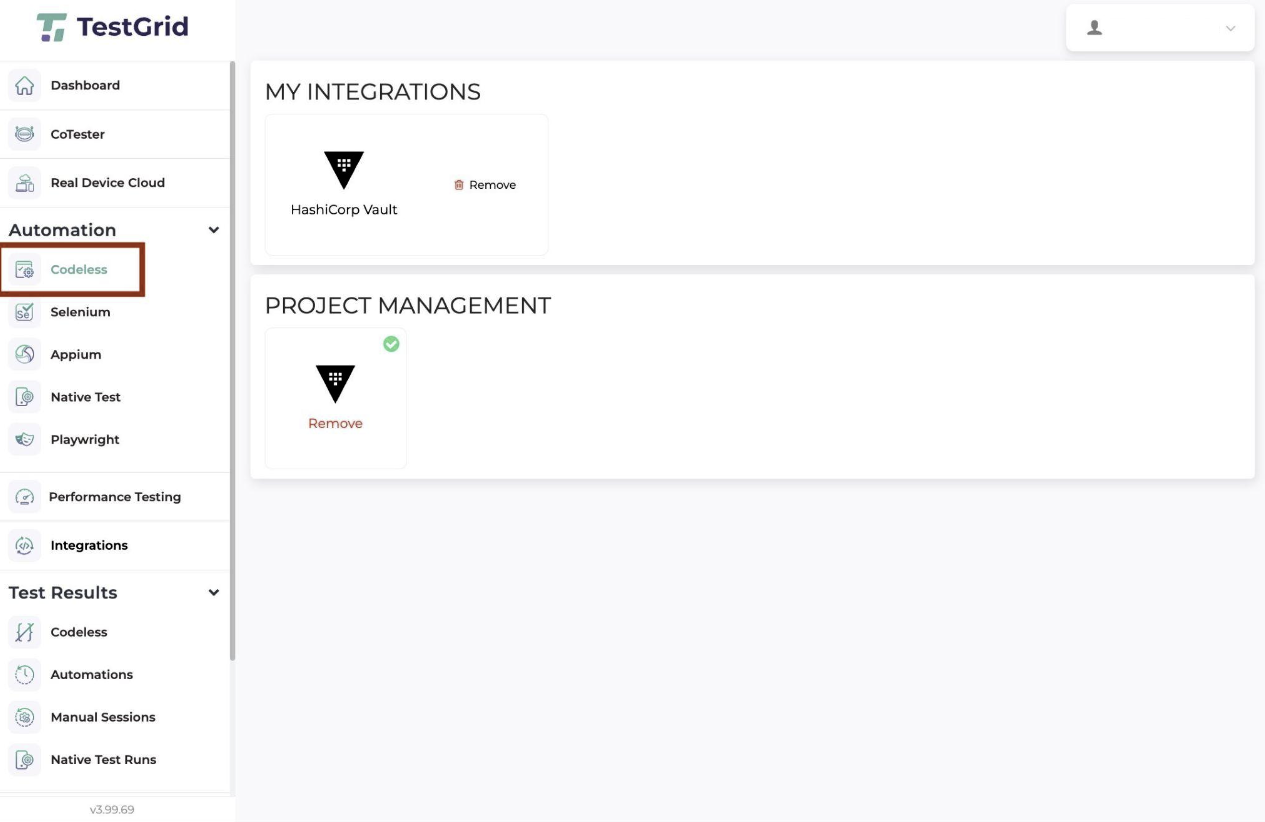
Step 5: Navigate to the Codeless module.
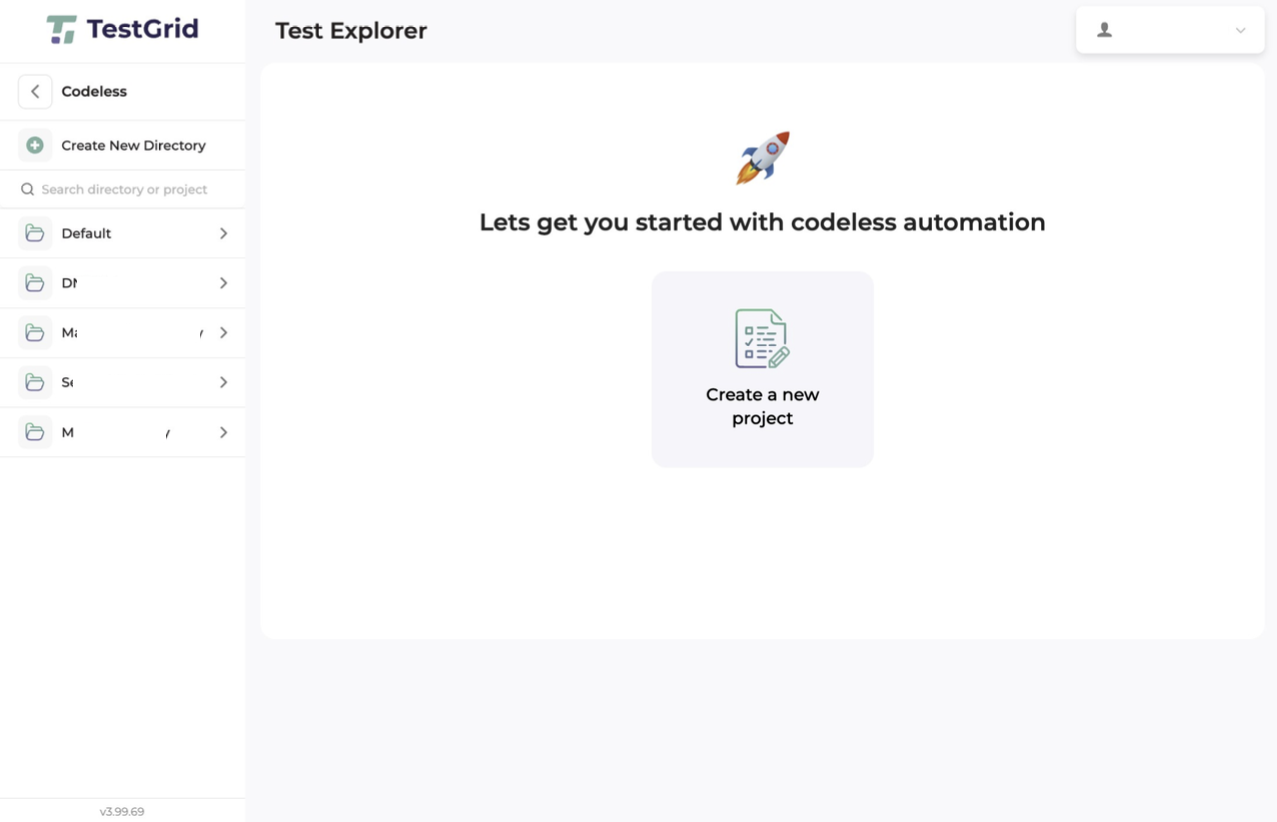
Step 6: Click Create a New Project or select an existing project from the directory to retrieve the Vault secret path in your test case and navigate to your test case.
Step 7: Open the respective test case with codeless to add the specific vault configuration to the test case.
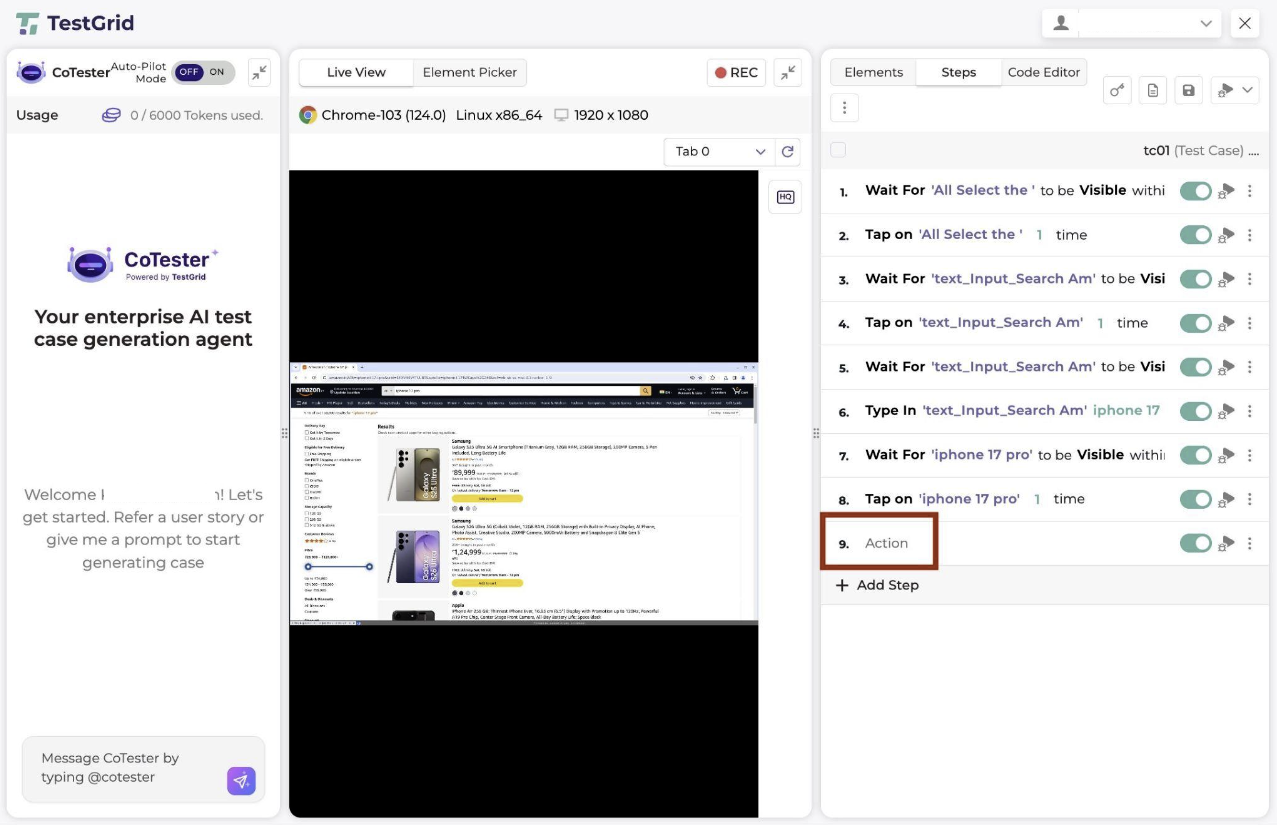
- Select the action keyword parameter for further configuration as depicted in the below screenshot.
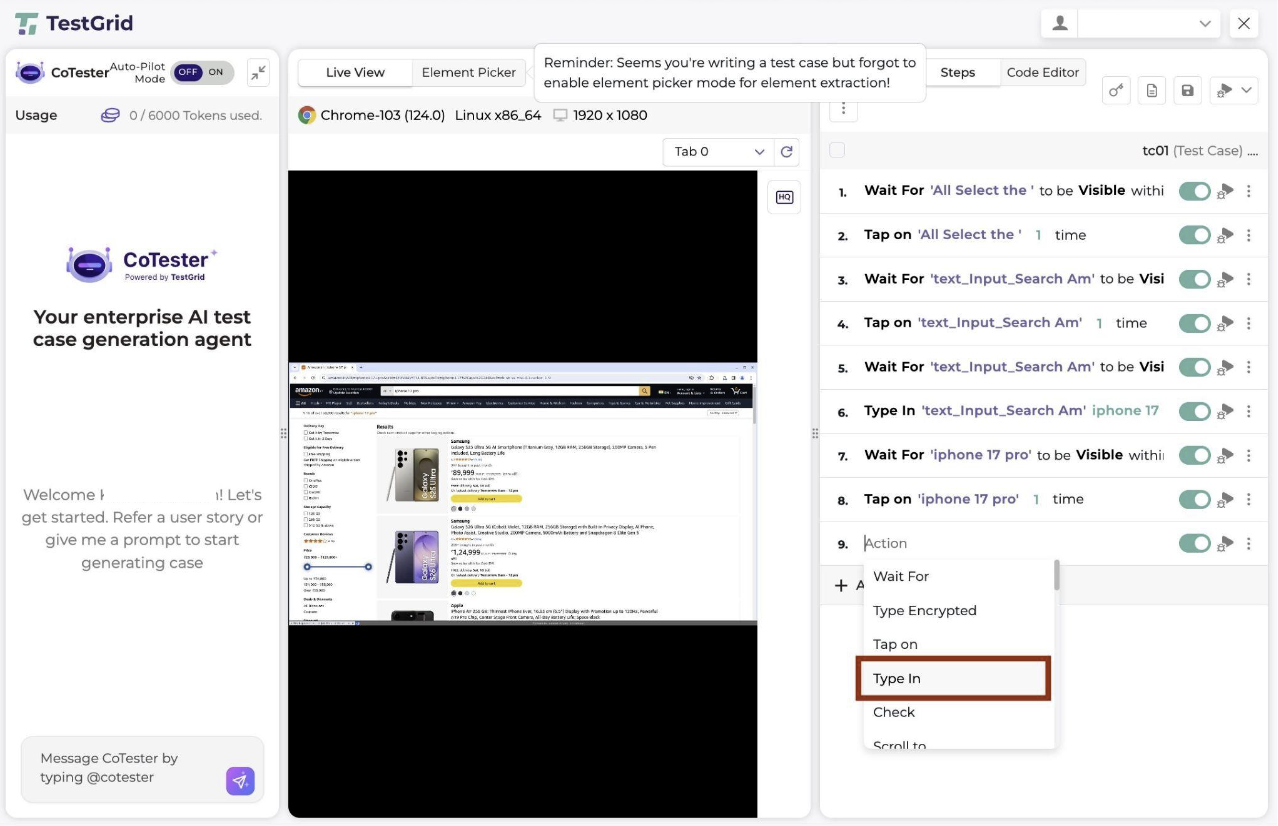
- Select a specific element where the action is to be performed using automation.
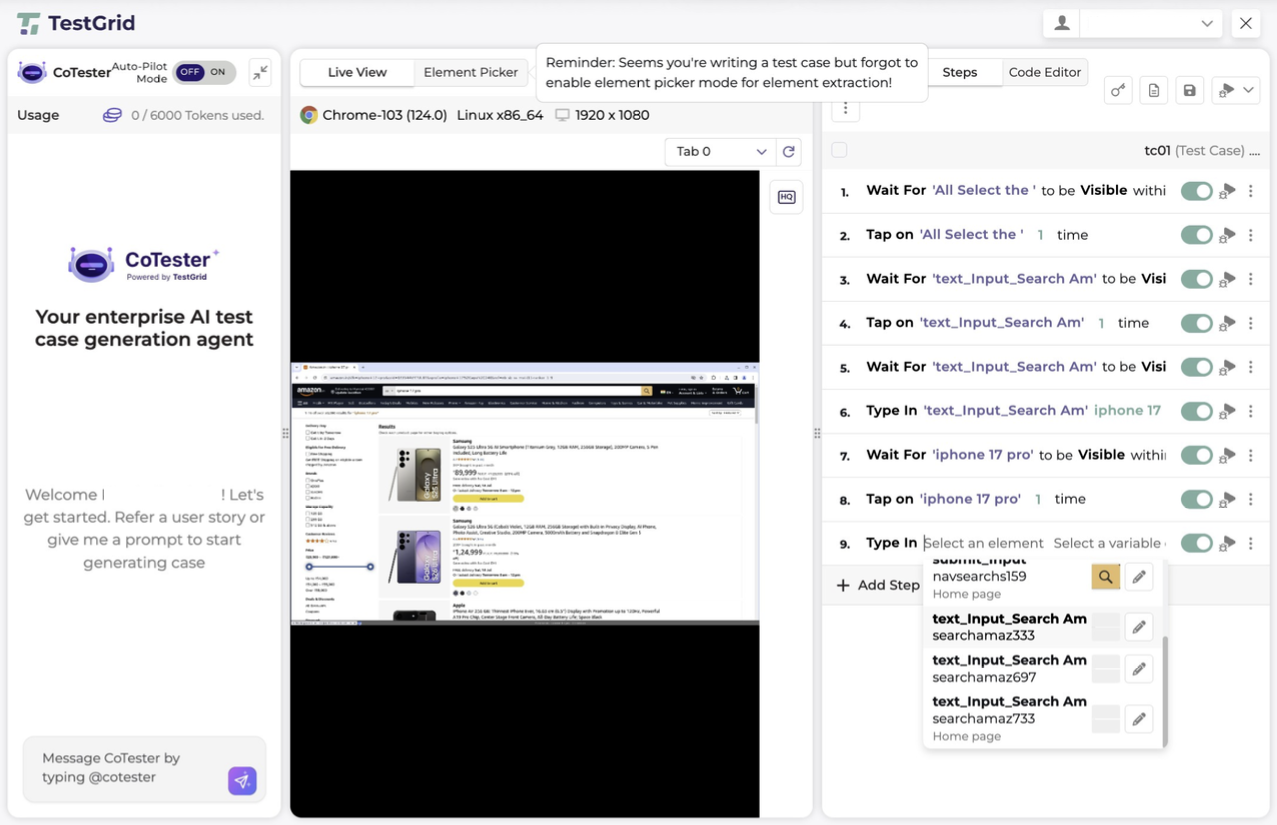
Step 8: Now, the keys from the secret path of HashiCorp Vault can be used as depicted below in the screenshot.
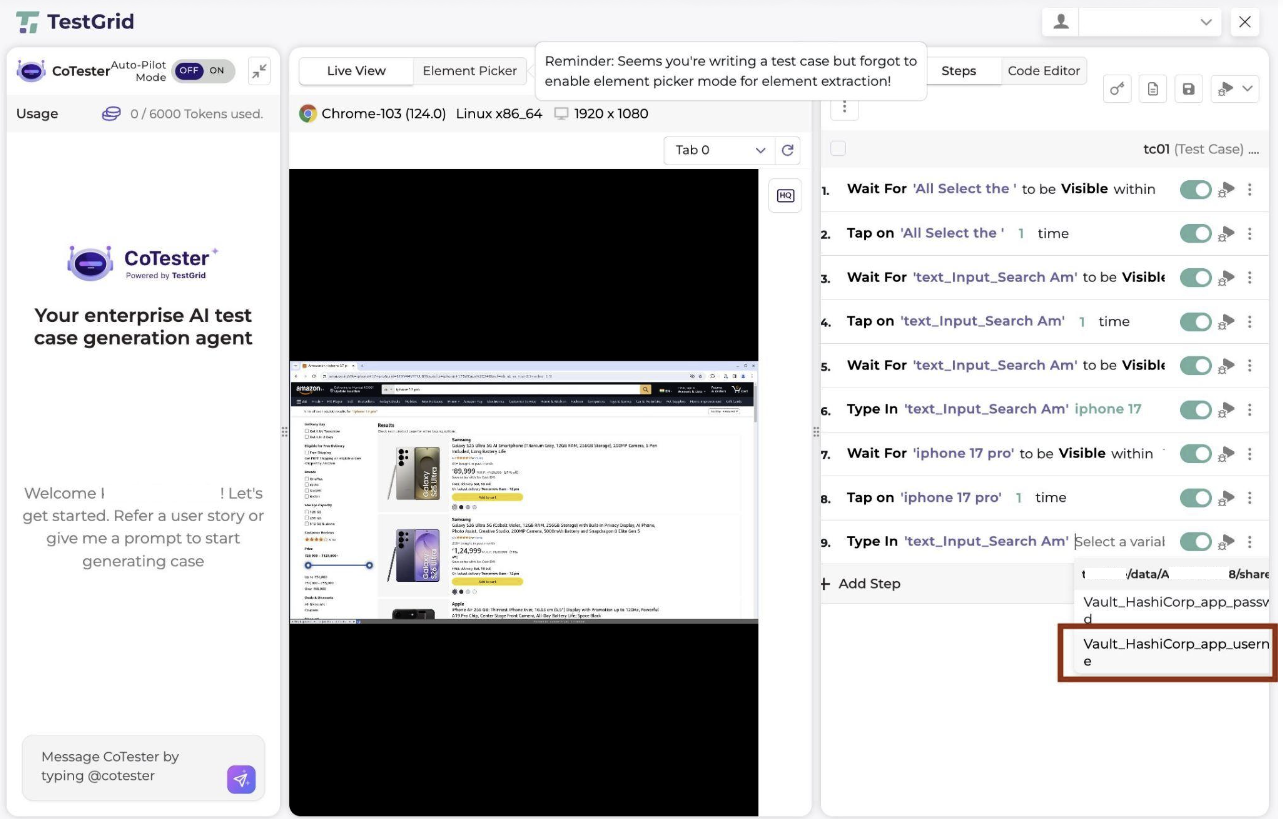
- The selected Vault key from the secret path will now be available in your test case.
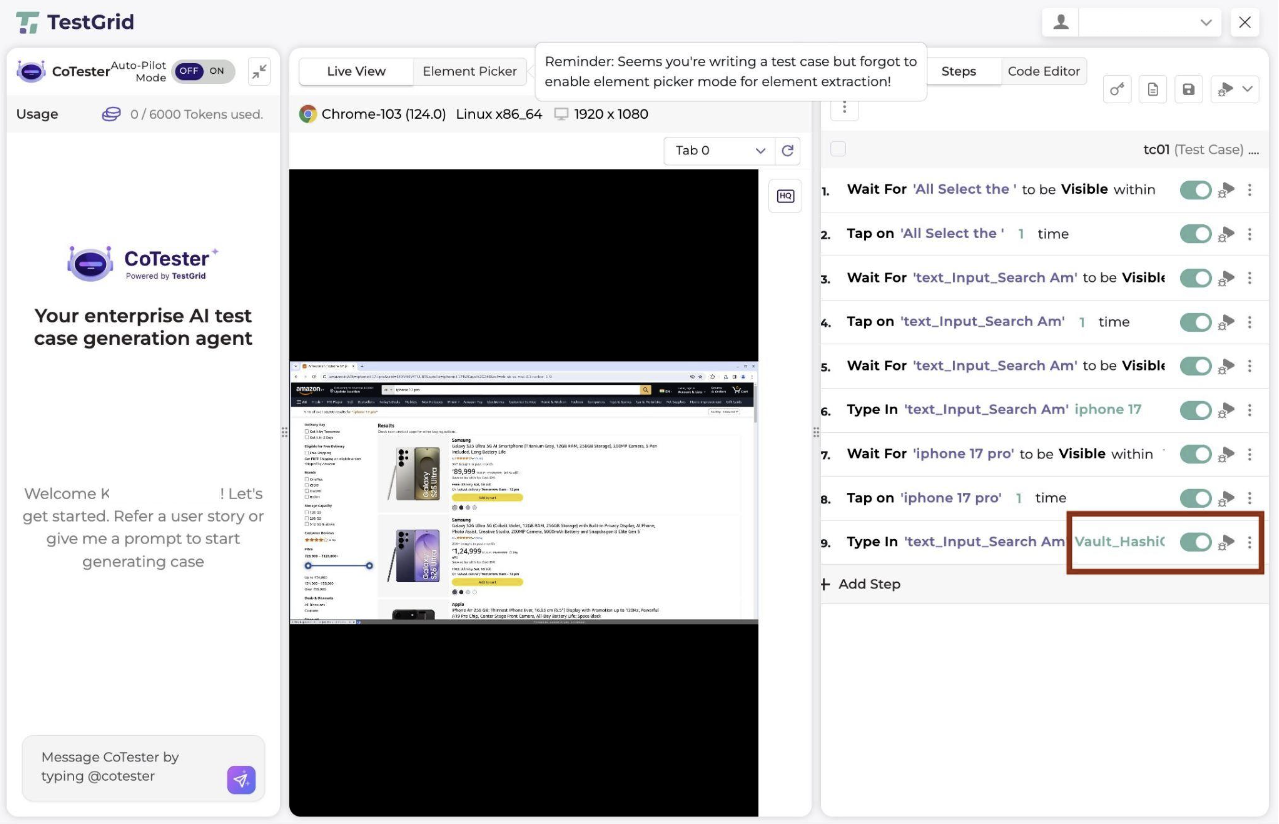
Table of Contents